Registered Student Organizations
RSO groups are allowed to have websites on our main SIU web servers. There is no charge for these sites, which are built on a WordPress platform. We supply basic template styles and the SIU logo. Groups are allowed to customize the sites as needed.
To request your website please fill out a Memo of Understanding and submit it by email or send it to:
Web Communications
Woody Hall – Room 241
Mail Code 6819
When there are new owners for the website (a new faculty member takes over the group or a new president), an updated MOU will need to be submitted. Only the site owner and web designate are allowed to request access or changes.
How to Use Wordpress
Intro Tutorial
The Web Communications team is not able to offer trainings on WordPress but there are a lot of useful resources on the web that can be found just by searching for it.
The following is a basic run down of the main menu options used to edit your WordPress site, you will find more detailed information on and helpful screen shots of each item by clicking below.
Getting Started
You will be assigned a user account for your organization. It will be something related to your organization, most likely something you have chosen.
- For example: https://yoursite.rso.siu.edu/
Note: WordPress administrative users now are required to use the 2FA authentication process to access their website.
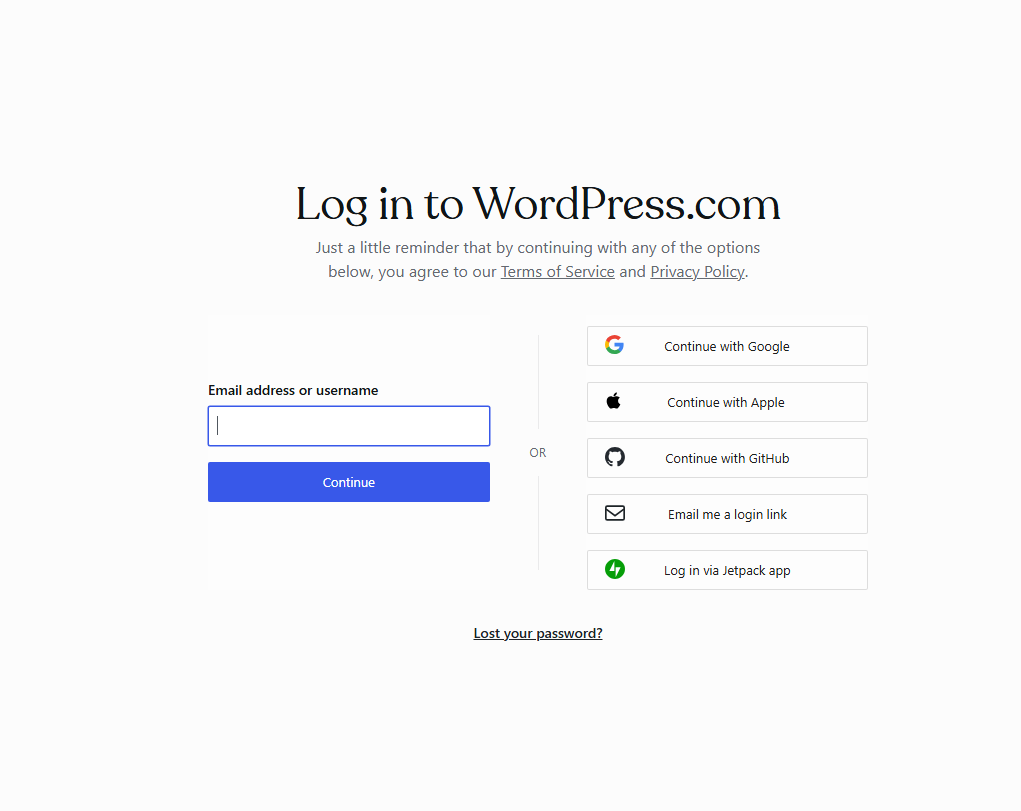
Logging In
To log on you will enter your sites name followed by wp-admin, which will take you to a log in page, where you will then enter in your user id, and your assigned pin.
- For example: https://yoursite.rso.siu.edu/wp-admin
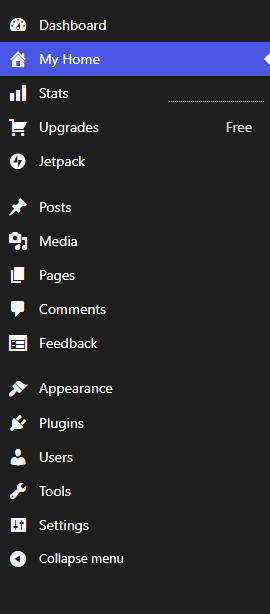
 After logging in you will be viewing your blogs dashboard. This is called a dashboard because it is the control center of your blog. You will see a menu on the right of your screen with various options that allow you to customize your content. At the top right corner you will see the name of your site.
 Tip: Pressing control and clicking the title will open the actual site in a new browser tab (Command click for Mac users).
This way you can easily go back and forth between tabs to the user interface and the actual site. Just make sure and refresh the actual site page each time you make changes so they will be visible to you. It’s not required you do this but it’s an easy way to monitor changes as you edit.
Posts
WordPress Posts are pieces of content that can be regularly updated on your website. They are perfect for blog entries, news updates, and time-sensitive content.
Creating a Post
To create a post, log into your WordPress dashboard, go to "Posts" > "Add New," and start writing. With each post, you can add images, videos, and categories to organize your content. You can then save it as a draft or publish it privately or publicly.

When to Use a Post or a Page
Create a post for your content that will be regularly updated, like blog posts or news articles. Pages are more for static information and are meant for more timeless information, such as an About page. Use posts to engage your audience with fresh content.
Categories: WordPress features a great way to organize your posts using ‘categories’.
Tags: are ways to add meta-data or searchable keywords related to your posts.
Blocks
Blocks in Wordpress represent a game-changer for content creation by simplifying how to build dynamic and visually appeasing posts and pages. Each element on a page or posted is treated as a building block that can be moved, modified or arranged freely. It can be easily customized while you are adding text, images, videos or other custom features, such as photo galleries and buttons.
In the WordPress editor, each paragraph, image, or video is presented as a distinct “block” of content.
Each block comes with its own set of controls for changing things like color, width, and alignment. These will show and hide automatically when you have a block selected.
All of the blocks available to you live in the block library. You’ll find it wherever you see the plus-sign icon.
Types of Blocks
There are several different kinds of blocks with different purposes.
- Text Blocks (Paragraph, Heading, Quote, List)
- Media Blocks (Image, Video, Gallery, Audio)
- Layout Blocks (Columns, Spacer, Button)
- Widgets (Shortcode, Archives, Calendar)
- Embeds (YouTube, Twitter, Instagram)
How to Add a Block:
- Create or Edit a Post/Page.
- Click the + Button: In the editor screen, you'll see a plus (+) sign where you can add a new block. This button appears on the editor or when you click on an empty area of your post/page.
- Select a Block Type: Once you click the + button, a list of block type options will appear. You can search for a specific block (like "Image" or "Heading") or browse categories (Text, Media, and Design).
- Edit the Block: Once the block is added, you can click to edit its content. Each block type has its own settings that appear in the sidebar, where you can adjust things such as alignment, color, size, and more.
Media
Media allows you to store media files for your site in the Media Library. Media includes images, logos, graphics, etc.
The Media Library allows you to upload media from your computer or a url and organizes and stores these files for your site.
To add new media you can either Add Media File and drop your file or select a file. You can also use the Import Media from Google Photos, Pexels or Openverse.
Please do not upload video files. Videos should be posted to YouTube or Vimeo and embedded onto your site. Don't forget to turn on captioning for your videos.
Pages
Pages are usually static, and the content may change but not often. Examples include an About Us page.
- To view a list of your pages, click ‘Pages’
- Click ‘Add New’ page and fill in your content using Blocks.
- Explore the available options and adjust as needed.
Appearance
Appearance controls the look and some interactive elements of your site.
- A basic theme is set up for your site. You are welcome to customize the theme.
Widgets: are the editable sidebar regions of your site.
- There are a number of options that you can choose to customize your site using widgets. For example, you can have calendars, tag clouds, links, a login area and more. The best way to figure out what will work best for you is to experiment with widgets.
More in-depth widget information is available from WordPress CMS.
Navigation Block
The Navigation Block is an advanced block in WordPress 5.9 that allows users to edit the navigation menu in both structure and design. It can be used with a block theme or as a theme that has support for template editing.
To add a Navigation block, click on the add block button and select the Navigation block option. You can also type “/navigation” and hit enter in a new paragraph block to add one quickly.
Note: When you add a Navigation block for the first time and don’t have any existing menu, it will start with a Page List block.
To edit the menu, open the Settings panel, and select Page List from the list view. Click Edit, and the page list items will transform into Page Link blocks.
Divi
Wordpress sites are installed with Divi, which is a popular WordPress theme and visual page builder that allows users to create and customize WordPress websites without the need for coding knowledge.
Once activated on a WordPress site, Divi replaces the default WordPress editor with its visual builder, where users can design pages and posts directly on the front end of their website. Sites then can be built using a drag-and-drop interface to easily create beautiful pages.
Start Building with Divi Builder
-
Create a New Page: In the Dashboard, go to Pages > Add New.
-
Once you're on the page editor, click the Use Divi Builder button to launch the builder.
-
Add Sections: You can start by adding sections (regular, specialty, or full-width) to structure your page.
-
Add Rows and Modules: Within sections, add rows and modules. Divi also offers a variety of already built modules like text, image galleries, buttons, sliders, and more.
-
Customize Content: Use the options in each module to adjust settings like font size, colors, margins, etc.
Important Links and Other Support
Customizing the Template
More customization options or specific functionality is available for sites in WordPress via Plugins. There is a large database of Plugins that you can easily access.