Page Editing
Methods for Adding Content
There are different methods of adding content to each region.
Text Only
Some regions only allow text entry with no added options, for example:

WYSIWYG Editor
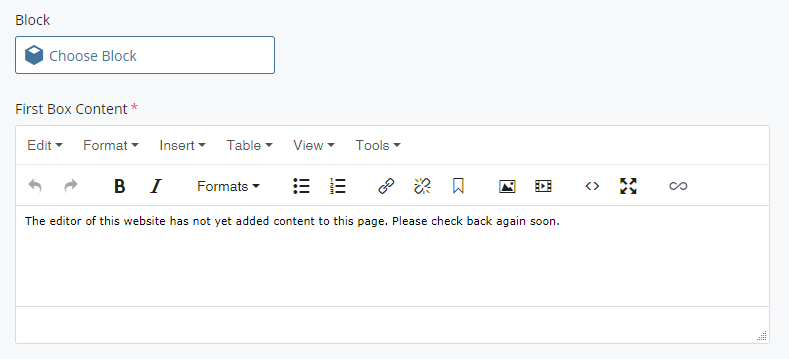
WYSIWYG stands for “what you see is what you get”. Some regions allow text entry with the options to add links, images and styling within text content.

File Selector
Some regions allow you to select files within the site to use in those regions. These are for adding images or blocks:

To use an image or block in these areas click the image or block icon and navigate to the correct file within your site.
File Selector or WYSIWYG Editor
For these areas, if a block is not chosen for content, the content of the WYSIWYG editor will be used. If there is no block chosen and no content in the WYSIWYG, the region will not appear on the page:

Regions where multiple items are allowed
If a region will allow for adding additional areas of content, a plus symbol will appear in the upper left of the region’s editing area. To add another area click the plus symbol. When there are multiple items in that region, a symbol in the upper right will appear that indicates which order the items are in, allowing the user to change the item order and allowing the user to delete the items. The symbol looks like this:
![]()
Use the plus and "x", and up and down arrows to add, move or delete items.
Anchors
Anchors allow you to link to content further down the page. Clicking the link will take you to that section of the web page. This is particularly useful for frequently asked questions pages, with anchors for each question, and a table of contents linking to them at the top.
To place an anchor on your page:
- Place the cursor where you want your anchor to link to.
- Click the anchor icon in the WYSIWYG (located to the left of the picture icon)
- Type in an id for your anchor and click insert. Note: Make sure to remember this id, you will need it later on.
- Highlight the text you wish to function as your link and click the hyperlink icon (located two icons to the left of the anchor)
- Enter the id of the anchor you just created in the ANCHOR text box and click INSERT. Note: Make sure to enter the id EXACTLY as you did originally, including capital/lowercase letters, dashes, spaces, etc.
- Submit your changes and publish the page. Click the link to test the anchor on the live webpage.

Adding a Link to Page Content
Add links to existing pages within your site, external websites, or to PDF documents.

- Within the WYSIWYG editor, highlight the word or words you wish to turn into a hyperlink.
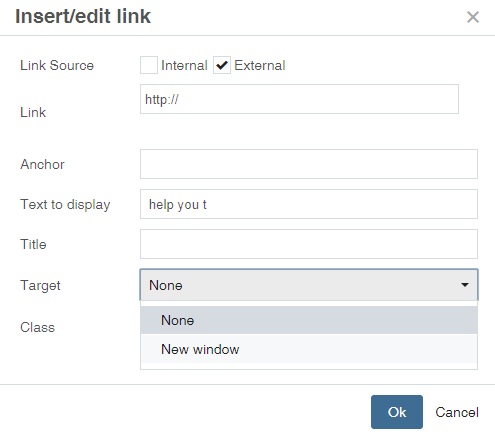
 Click the insert web link icon on the toolbar. The insert link window will now open with two options - one for internal links, and one for external. [image]
- To insert a link to a page or document within your site, click “Choose File, Page or Link” to open a new window that will allow you to select the page to which you will link.
- To insert an external link, paste the URL of the external link into the LINK field. Change TARGET to New Window if you want the new page to open in a new window.
- Click OK
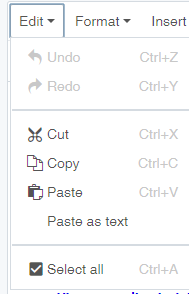
You may not right click the mouse to cut, copy, or paste within the WYSIWYG. Instead you must highlight the text and press the cut/copy/paste icons on the WYSIWYG panel or use the keyboard shortcuts.
Windows Users:
- Cut: Ctrl + x
- Copy: Ctrl + c
- Paste: Ctrl + v
Mac Users:
- Cut: Cmd (⌘) + x
- Copy: Cmd (⌘) + c
- Paste: Cmd (⌘) + v
Table
Tables should only be used to display data. There are many accessibility requirements with tables so most of the time, it's easiest to create the table you want, and then to fill out a web ticket to let us know you added a table that we need to code for accessibility. You can add a table by copying and pasting it from Microsoft Word, or you can use Cascade's table tool.

On all tables do the following for accessibility:
- Add a table summary (example: summary="summary of table")
- Always wrap the interior of the table tag in <tbody> tags
- If adding table headings (th) make sure to match the id of the th with the "headers" on the corresponding td (example: headers="course").
- Add aria-labeled tag and refer to a caption, heading, or any other piece of content with an id (example: aria-labeled="caption").
- Use a caption tag to add a title for the table: <caption id="caption">Accountancy, required 6 hours</caption>, for example.
HTML Editor
This is a helpful feature for those who wish to view and edit a page’s HTML directly. If you are unfamiliar with HTML, do not fear. The WYSIWYG will allow you to fully edit your page without it.

Lists

Bullet and numbering alternatives are available for any information you wish to put in a list format.
- Highlight the desired text
- Press bullet/number list in the WYSIWYG.
If you have multiple list in one pressing tab once indents your information starting the next list and pressing enter twice returns you back to the previous list. For example:

- Apply and be admitted as a first time freshman at SIU
- be a U.S. citizen, or other eligible non-citizen
- be enrolled in a two- or four-year degree program
- be enrolled at least half-time
- live in Southern Illinois
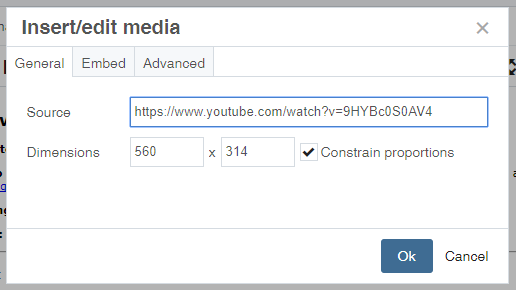
Embedding a video or presentation of some sort is done by clicking on the film strip on the WYSIWYG. When embedding video, be sure that the video has closed captioning added to it for accessibility purposes. YouTube does this automatically, and we recommend using it for video hosting.
To embed a YouTube video:
- Go to the video, and copy the URL
- Go back to your page in Cascade and click the film strip on the WYSIWYG.
- Paste URL you copied from YouTube into the box marked “Source” and submit your changes.


To add a video to YouTube itself, follow these steps:
- Sign into YouTube.
- Click the Upload button at the top of the page.
- Select the video you'd like to upload from your computer. You can also create a video sideshow or import a video from Google Photos.
- As the video is uploading you can edit both the basic information and the advanced settings of the video, and decide if you want to notify subscribers (if you uncheck this option no communication will be shared with your subscribers).
- Click Publishto finish uploading a public video to YouTube. If you set the video privacy setting to Private or Unlisted, just click Done to finish the upload or click Share to privately share your video.
- If you haven’t clicked Publish, your video won’t be viewable by other people. You can always publish your video at a later time in your Video Manager.
Adding closed captioning to your YouTube video:
- Go to your Video Managerby clicking your account in the top right > Creator Studio > Video Manager > Videos.
- Next to the video you want to add captions or subtitles to, click the drop-down menu next to the Edit
- Select Subtitlesand CC.
- Click the Addnew subtitles or CC
- Choose automatic captioning
